
Continuously Deploying with StriderCD
A Promising Product With Some Rough Edges

This is the story of how I met StriderCD, how I used for a cool project and how it has grown to be the deployment tool at my regular job.
If you are new to continuous deployment you may want to get some background before you read this article. We will still cover the basics here.
The Project
As you may know I work full time for MediaSmart Mobile, but I also do stuff as a freelancer for other organizations. Usually as a scalability consultant, although I also work in other areas such as continuous deployment. This gives me the opportunity to know other interesting projects, and quite often to use cool new products.
My friend Diego Lafuente asked me to help him in TaxiTime, an ambitious global taxicab aggregator from HotelBeds. The job included scalability and continuous deployment, my two favorite areas of software development, so I couldn’t say “no”. (Perhaps I even said “yes” a little bit too emphatically.)
Continuous Deployment
As usual I started by setting up continuous deployment, the first and perhaps the most important part of any software project for me. It ensures that developers can focus on writing code, while tools worry about testing and integration. (Of course you have to test and integrate yourself at least once; but then these boring tasks will be automatically repeated as often as needed.)
When we are writing code we want to see the result of our work as soon as possible. There are a few strategies to achieve this goal: we may deploy to an integration environment where we test and verify everything, and then when everything is ready deploy to production. Or we can choose to deploy straight to production.
In general I am a fan of deploying straight to production, since it gives the team an agility that is both exhilarating and rewarding. But it is reserved for the bravest of developers. I admit that it carries a burden that not all organizations are prepared to accept. In particular, breakages of a web interface can be quite ugly.
Many people are more comfortable deploying to an integration environment, doing a manual revision and then deploying to production. This was the case in TaxiTime, so we chose the more conservative approach: there is a team of developers writing code in GitHub and creating pull requests against a development branch. When a pull request is accepted it must be integrated into the development branch, then tested locally and finally deployed to the integration environment. Deployment to production only happens when there is a new release ready.
The tool has to notify the team how testing and deployment went. In case of a failure, it must allow re-running the tests. As a plus, it should run the tests not only on the main branch, but also on any proposed pull requests.
Choosing our Tools
What choices did we have?
I am the author of a humble deployment package, which we have used in MediaSmart Mobile with certain success. But alas, it lacks a GUI: every new project therefore needs to be setup from the command line, which can be cumbersome.
I had a serious case of GUI envy, but the options were not all that attractive. Travis-CI for private companies is expensive, and installing a Ruby package locally was not in the plans. Plus, I am bothered beyond measure by its name: Travis has “Continuous Integration” in the title (the “-CI” part).
And now for the elephant in the room. I have long followed Jenkins from a distance, but it is a Java mastodon, probably more suited to heavier workflows. Just the list of plugins is daunting. And again there is that CI in the domain URL.
Integration vs Deployment
What’s the problem with continuous integration? The idea of integrating code often can be traced back at least to Microsoft’s Daily Build and Smoke Test, where code was integrated and tested every day. Later the practice was refined and adopted by Extreme Programming proponents, so code could be integrated and tested multiple times a day.
But why stop there? In the 2010s some brave teams around the world started deploying code right after integrating; see the excellent “Web Operations” by Allspaw and Robbins. Only then can you talk about “continuous deployment”.
Saying “continuous integration” is probably just a sign of the age of those projects, but to me it signals a dangerous focus on the wrong part of the process. Unless you are willing to take the crucial step of deploying after integrating, you are missing out on the biggest benefits of the technique.
Meet StriderCD
A few months ago Juan Carlos Delgado, CTO at llollo.com, told me in a private conversation that he was using StriderCD. I liked two things about it very much. First, that it had “Continuous Deployment” in the title, as if the creators had a clue. Second, it is written in Node.js. It is thus that it won my heart even before I saw it in action. I am glad to say that it has not disappointed.
Diego was kind enough to let me play with this new toy for his project, and of course I (being a responsible freelancer) would only bill the project for any time spent if we found that StriderCD was a good fit. So I started installing and configuring it.
Continuous Deployment, the Strider Way
I am not going to write a guide on how to install and use Strider; there are very good resources out there, starting with the Strider homepage. I will just give a very broad overview of how Strider works, and then tell you about our experience.
Repos and Projects
Strider integrates closely with many code repositories: GitHub, Bitbucket and Gitlab. Every time there is a change in a watched repo, it can be configured to run a test suite, and if everything goes well carry out a deployment.
There is a very nice dashboard, shown below, to control multiple projects.

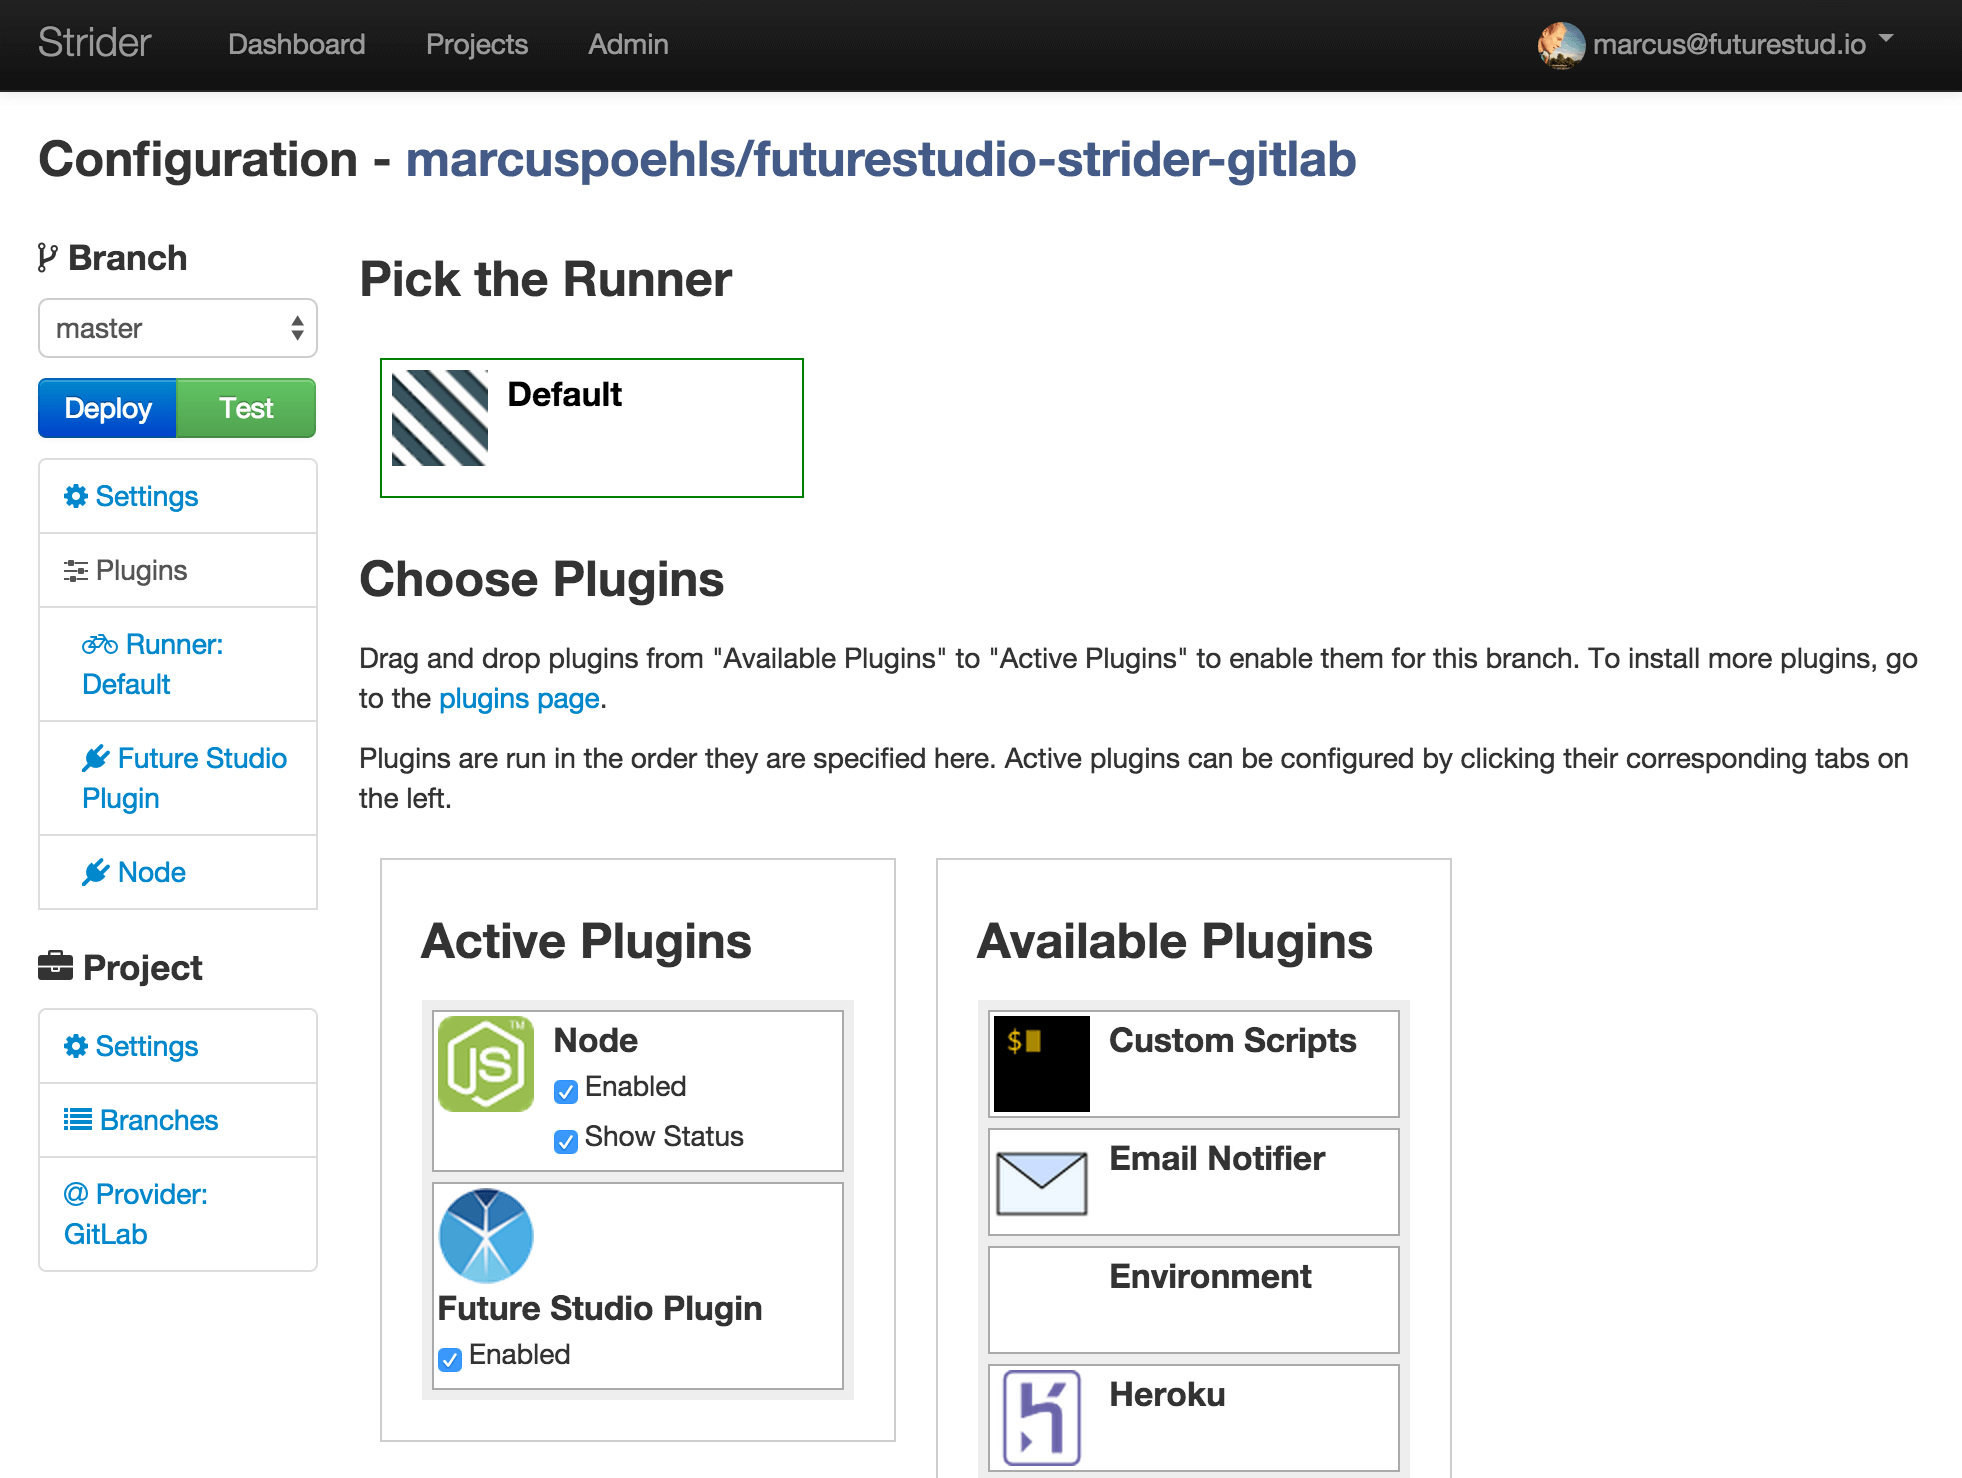
Plugins
For every project a number of plugins may be enabled, which carry different tasks: deployment for a few different platforms (Node.js, Ruby, Python or custom), sending email, running a local or remote deployment are a few of them. Plugins can be enabled or disabled for master, for all branches or for a custom branch.
Strider can also be integrated with Slack using the relevant plugin, which can be important for many teams.
Testing
Tests are usually the first part of a deployment process: verify that everything is still working.
Strider will just run a preconfigured command (for Node.js it can be
npm test, make test or none), or a custom
command. Just as with other Unix console commands, if the command
returns 0 tests pass; otherwise tests fail. Don’t be fooled by this
simplicity; it allows for infinite configurability just using standard
commands.
The Deployment Itself
Deployment processes are as varied as production environments: the set of machines to deploy can range from a single server to several regions that span the globe. For a sophisticated distributed deployment, you may have to read a list of machines connected to a load balancer, contact each one and convince them to apply the latest changes: download, perhaps recompile, then restart the service. All this without causing disruption in the global service.
For the task of deployment Strider goes again for simplicity: it just allows to configure a local task (using the Custom Scripts plugin), a remote task (with the SSH plugin) or both. There is no coordination or orchestration here. But it can be enough for most workflows.
If you want to deploy on a dynamic set of machines you have first to create a script to select the relevant servers and contact them, and then invoke that script from Strider. It is a nice lightweight approach: you probably have such a script somewhere already, if only for manual deployments. So you can reuse your usual deployment routine here.
StriderCD in Practice
After this brief theoretical introduction, it’s time to start working. How did we approach the continuous deployment process? The immediate goal was to set up an integration environment, where code is deployed every time that a change is made on the repository.
Install Strider
The installation
was a breeze: basically download StriderCD from the repo and use
npm:
npm installYou need to add the admin user manually after that. You also need a local MongoDB, and little else.
To run in a local server it is best to configure a native task, be it Upstart or systemd.
And now the fun begins!
Use a Cute Server Name
For a local server, the defaults are probably fine. But you want a server everyone can access, like with Travis.
First you have to expose your Strider server using a DNS name, e.g. stridercd.taxitime.com. You can also use an IP address and the default port 3000, but that is ugly; with little effort you can use Apache or Nginx to redirect connections for the Strider DNS name to port 3000 of the same machine. As you can see in this Nginx configuration, it is very easy:
server {
    listen 80;
    server_name stridercd.taxitime.com;
    location / {
        proxy_pass http://127.0.0.1:3000;
    }
}
From that point on, you can access your Strider server as http://stridercd.taxitime.com/.
GitHub Integration
In our case we are using GitHub private repositories. StriderCD uses webhooks to be notified when there are changes on the repository. This GitHub integration is thus a vital point, and it was the first issue that I met.
The idea is, like in Travis-CI, to authenticate using OAuth2 so that Strider can set up the webhooks for you. With a third party server they have already done the integration for you. But for a private application you have to do the integration yourself, and it is not trivial. The idea is that once you authenticate with GitHub, you have to be redirected to your local Strider server. So you need to create the app in GitHub.
This is done in the settings page:

And click on “OAuth Applications”, then go to the tab “Developer applications”:

When you click on “Register application” you should see a screen similar to this:

When you use your personal settings, Strider will only be visible to you. If you want everyone in an organization to be able to authorize Strider then you will need to use the “Organization settings” that can be found below your “Personal settings”:

Enter a custom name (say, stridercd-taxitime) and the URL (in this
case http://stridercd.taxitime.com/)
you will get an application ID and an application secret, which are then
used to configure
StriderCD. Also be sure to tell Strider what its URL is with the
SERVER_NAME. The environment variables should look
something like this:
export SERVER_NAME="http://stridercd.taxitime.com"
export PLUGIN_GITHUB_APP_ID="abcdabcdabcd"
export PLUGIN_GITHUB_APP_SECRET="defgdefgdefgdefgdefgdefgdefgdefgdefgdefg"
export PLUGIN_GITHUB_API_DOMAIN="https://github.com"
export PLUGIN_GITHUB_API_ENDPOINT="https://github.com/api"
Finally, pay attention to the list of known issues.
Configuration
Each repo needs to be configured individually. For the develop branch we had to deploy to integration, which means a local task.
For master we wanted to deploy to production. Since TaxiTime is in an early stage we have just a couple of servers, so we just needed a remote task that SSH’s into two servers, update the repo and restart the service.
All that was left was configuring email notifications and a couple of other details. The process was really simple, even if we had to repeat it several times.
Weird Stuff
It was not all smooth sailing; there were some rough edges in the process.
Variables
As you have seen, Strider uses a few environment variables to run. If
you enter the variable SERVER_NAME wrong, or if you miss
the two PLUGIN_GITHUB_APP... variables, the error is
not immediately evident.
I suffered this particular issue myself; then I thought that the
server name was not being read correctly, and created this very
misguided pull
request to let strider-github use the “correct” server
name. Luckily the very nice Ilya Radchenko cleared the
misunderstanding on my part. Fixing the SERVER_NAME was
enough to get it working.
But the truth is that I had to go look at the source code to understand how env variables were read, and even then the code was a bit convoluted.
Being Admin
You need to be an admin of the projects you want to deploy, because otherwise Strider cannot add webhooks to it. But when you are not admin you were greeted by an odd message.
I opened a GitHub issue which was answered almost immediately, and then offered a pull request to improve upon the error message, which was also accepted immediately.
Non-admin users cannot see any projects by default. Users must be added manually to projects, one by one, to be able to view or run them. This is a cumbersome process which could be made quite easier with groups. Right now the obvious solution is to make everyone an admin, which is less feasible for a large company.
A Poltergeist
The weirdest issue that we had in TaxiTime was when we could not access the server after a restart. Luckily my friend Fernando Sanz is a senior member of the team and founder of Smart Node, a development shop specialized in mobile apps and Node.js. He was able to solve our poltergeist by debugging directly the Strider process.
Fernando gave a talk at Node.js Madrid a year ago about debugging Node.js with Node Inspector, so he knows his tools. After we had all but given up on solving this strange problem, he fired up his trusty Node Inspector and started debugging the Strider process, and after a while he found out that an environment variable was shadowing another one used by StriderCD. Needless to say, he left us all flabbergasted. One more point for having a Node.js application.
After All Is Said and Done
The experience was in general quite good, given that continuous deployment is a complex technique that requires a lot of integrations between spinning wheels. We were able to solve all issues, even the weird ones.
And what is even more important, the customer (in this case Diego and his company) are happy with it.
MediaSmart
After the good experience, we are replicating it in MediaSmart with a bigger, more complex set of projects. This task was done by our new colleague Alfredo López Moltó. After a few weeks we are deploying everything using Strider, which is a big accomplishment for someone new to our architecture.
Alfredo is also getting involved in the project, by raising an issue,
and he is even writing a pull request to solve it: upgrade
npmto v3.x.x. StriderCD and in particular strider-node
developers have so far been very amiable and encouraging.
We are missing some things from our old deployment infrastructure. With our old system we had the ability to send a list of commits in deployment mails, and even the complete diff of changes. That is not possible with StriderCD (yet?). But we are willing to contribute our time and effort to improve the existing email plugin, and therefore to make it more useful to everyone.
Conclusion
StriderCD has most of the advantages of modern continuous deployment tools, but without the baggage that some of them carry. Configuration is easy, tests run fast, and all in all it works as expected.
If you have already a large inversion in Jenkins or some other tool, or if you have complex needs in your deployment process, it may not be worth your time to switch. Strider also has a few sharp corners, so be ready for some early adopter pains.
For new projects with simple needs it is an excellent choice. This little tool no doubt has a bright future ahead.
Acknowledgements
Diego Lafuente (HotelBeds), Fernando Sanz (Smart Node) Juan Carlos Delgado (llollo.com), have made the original project possible.
Juan Carlos Delgado (llollo.com), Alfredo López Moltó (MediaSmart Mobile, Jovica Aleksic have reviewed this article and helped me improve it.
My gratitude goes to them all.
Published on 2016-04-03, last edited on 2016-04-04. Comments, improvements?
Back to the index.